How to Set Up Pi Node on Your Computer with PureVPN + Port Forwarding

You can earn a bit more of Pi bonus mining rate if you have a dedicated Pi Node running on your laptop or desktop. Here is my walk-though for specifically Mac OS Sequoia, which I manage to resolve even with numerous road blocks due to of the latest changes on the Mac update and Docker malware downloads, vendor-specific port forwarding limitations, and lack of available static IP from my internet service provider. The steps are similar for Windows and Linux folks, however the screenshots are Mac OS focused.
Another stag from my internet provider, CenturyLink, is I am under their Carrier Grade NAT (CGNAT) plan, which will throw a wrench in the port forwarding steps, even if I set it up correctly. I’ll walk you through what I did to get port forwarding to work.
Disclaimer
Be advise that this is the most straight forward way, even for people who can have basic understanding of networking and can follow instructions. You can also rent a Virtual Private Server, but it require a bit more steps and networking knowledge/command line terminal set up.
Running a VPS is a kit $2 a month while my set up is $5–6.25 a month. Another plus for my set up is, I am already planing to get a VPN anyways. If you do decide to proceed, then continue on with the guide.
Requirements:
- 1 laptop or a spare computer that can act as a node, running on Mac or Windows. Basically it will be a server.
- 1 static (dedicated) IP address. You can buy this plan from your Internet Service Provider (ISP) or use a VPN that supports port forwarding. This is an add-on service that ranges around $10–20 extra a month, depending on your ISP.
- 1 VPN plan that supports dedicated IPs + port forwarding . This could be extra if your ISP does not offer a static IP address, or only support limited open ports for the port forwarding set up. I used PureVPN. You can get 15 days free trial to test out PureVPN here. Their standard VPN plan is about $2–3/month, dedicated IP is about $2.5/month, and port forwarding is $1.5/month. All prices are in USD currency.
My Mac Set Up:
- Mac OS 15.3.1 (24D70)
- Docker Version 4.38.0 (181591)
- Pi Network Version 0.5.1 (0.5.1)
1. Download Docker Desktop for your respective OS
The download site https://docs.docker.com/get-started/get-docker/ contains desktop versions for windows, Mac, and Linux.
Mac Users can select Intel or chip or Apple silicon chip download. I check mine to make sure it is Intel :


2. Install on Your Local Computer

If you have any error on the installation, like the Malware Blocked message, make sure you update your Mac first. If the pop up still appear, then you need to run a script.

Download this bash script and run in the command line. Or you can just copy paste each command down below:
#!/bin/bash

# Stop the docker services
echo "Stopping Docker..."
sudo pkill '[dD]ocker'

# Stop the vmnetd service
echo "Stopping com.docker.vmnetd service..."
sudo launchctl bootout system /Library/LaunchDaemons/com.docker.vmnetd.plist

# Stop the socket service
echo "Stopping com.docker.socket service..."
sudo launchctl bootout system /Library/LaunchDaemons/com.docker.socket.plist

# Remove vmnetd binary
echo "Removing com.docker.vmnetd binary..."
sudo rm -f /Library/PrivilegedHelperTools/com.docker.vmnetd

# Remove socket binary
echo "Removing com.docker.socket binary..."
sudo rm -f /Library/PrivilegedHelperTools/com.docker.socket

# Install new binaries
echo "Install new binaries..."
sudo cp /Applications/Docker.app/Contents/Library/LaunchServices/com.docker.vmnetd /Library/PrivilegedHelperTools/
sudo cp /Applications/Docker.app/Contents/MacOS/com.docker.socket /Library/PrivilegedHelperTools/
You should be able to restart the Desktop Docker app now.
Also make sure your Firewall allows the Pi Browser application through. For Mac users, it is in Security & Privacy >> Firewall. If your Firewall is off, then this step is not necessary. If it is on, then click on Firewall options,

and like we are missing Pi Browser. So add that program to allow incoming connection.
2. Download Pi Node App
The deskop app for Windows or Mac OS is available at:
https://minepi.com/pi-blockchain/pi-node/

3. Open Desktop Docker App and Pi Node App
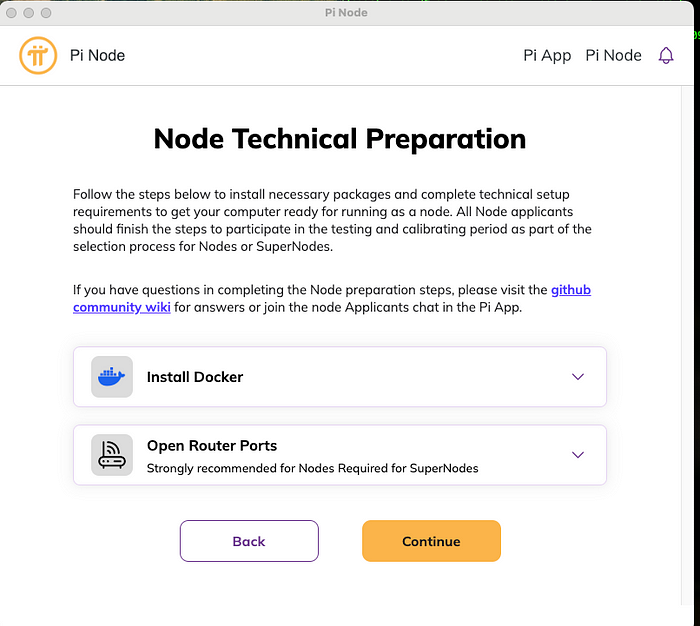
Open the Pi Node app, click on Pi Node on the top right navigation link, and click on Visit tech setup button. This will take you to the Pi Node Technical Preparation screen.

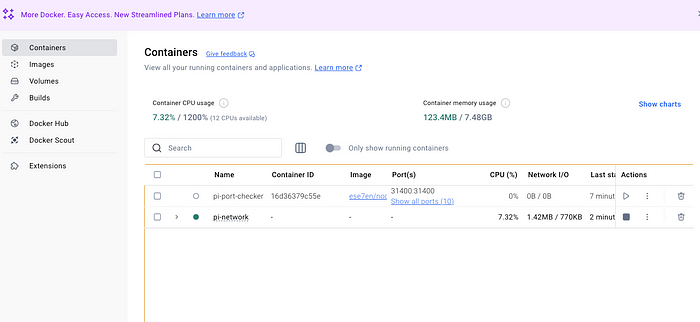
View of my Docker Desktop with Pi Node running:

4. Find your device’s internal ip address
You might need to have a static IP address. Reach out to your ISP and pay a monthly fee to do that. Unfortunately for me, my CenturyLink ISP no longer gives out static IP for a monthly price. There are a couple ways to still go around this issue with a VPN.
But first, let’s cover our bases and still hook it up in the router for my ISP. You need your IP address to manually put it in the form for port forwarding.
Open your terminal and use ipconfig getsummary en1 following for your IPv4 address for wifi connteciton. For ethernet connection, use ipconfig getsummary en0.
codergrr@macmini ~ % ipconfig getsummary en1
<dictionary> {
  BSSID : <redacted>
  IPv4 : <array> {
    0 : <dictionary> {
      Addresses : <array> {
        0 : 192.168.0.19
      }
      ChildServiceID : LINKLOCAL-en1
      ConfigMethod : DHCP
      DHCP : <dictionary> {
        LeaseExpirationTime : 03/03/2025 14:36:16
        LeaseStartTime : 03/03/2025 13:36:16
        Packet : op = BOOTREPLY
...
Based on the result, I know my device’s internal network IP is 192.168.0.19. Remember this number for next step.
Another way to find your internal IP address is to go to your Networks setting and find the TCP/IP address. Notice this is not the public IP address, which generally is dynamic.

5. Log into the admin portal of your router (from your Internet Service Provider)
In order for Pi Node network to reach your instance, you need to open the suggested TCP/IP ports. This step depends on your internet service provider (ISP). You would need to log into your own router admin portal to set up.

I have CenturyLink internet provider, for example, and the tutorial mentions using http://192.168.0.1/ address on my browser to login.

- For Comcast XFinity folks, the login to the admin tool is at http://10.0.0.1, according to their online guide.
- AT&T uses http://192.168.1.254, according to their online guide.
- Verizon Fios uses http://192.168.11, according to their online guide.
Most of their admin password is located underneath the physical router box in your living room/bedroom or where you set up your home internet.

These are just examples and not a comprehensive list of all ISP, just Google search “[Insert Internet Service Provider Name] Router Admin Login” and you should find their own help page on the result page.
6. Set Up Port Forwarding on Your Admin Router
Now use the internal IP address you got from step 4 and put it in your Port Forwarding set up. This might look different for your admin terminal, but they usually are in Advanced Setup >> Port Forwarding. The forms usually ask for the IP address, and the range of ports to forward.
Remember our Pi Node asks us to keep ports 31400 to 31409 open, so we need to configure this range in the Port Forwarding form.
7. Restart Services First
Notice: Remember to restart your router, your Docker, and also Pi Node after inputing the changes in port. If you have an older Pi Node version, make sure everything is up to date before proceeding. This means running the latest Mac OS, Docker version, and Pi Network versions.
My setup: Mac OS 15.3.1, Docker 4.38.0, Pi Network Version 0.5.1
8A. Turn Your Node On

This port forwarding issue is highly dependent upon your ISP. I ran into LOTS OF ISSUES, and I realized I am not the only one. If you have a CGNAT ISP plan, then most likely this is what’s blocking you.

Also, my CenturyLink ISP no longer gives out static/dedicated IP address, so I either have to switch to a new provider or use a VPN. I signed up for a few VPNs and failed (Surf shark did not work with me). However, I got found another solution using PureVPN. (Other VPNs with dedicated IPs and port forwarding, in theory, should also work.)
8B. [Optional] Port Forwarding with Pure VPN
You may or may not need this step depending if your ISP provide the dedicated IP add-on to your internet plan and if you get a business plan that’s not CGNAT plan. I have to grab the dedicated IP with Pure VPN here to bypass the CGNAT issue. Try their free 15 days of PureVPN trial here.
After you sign up, click on Subscriptions navigation item >> Port Forwarding >> Configure

In the Port Forwarding page, select the Enable specific ports option, and add all the 31400 to 31409 ports:

9. Voila! It finally works,
Now go to Pi Node and turn it on again. Go to Glad to see that the first 3 are open. It is normal to have a few ports open, since Pi docker container uses the 31401, 31402, 31403.


10. Finally, check Pi App for Rewards rate update.
As the time I am writing this aritcle on March 3rd, 2025, the base rate is slashed again to 0.0029 Pi/hr. Notice that setting up a Pi Node increases the Node Bonus under Rewards calculation.


References:
- If you run into issues with Pi Node, go to the Github Issues page: https://github.com/pi-node/instructions/issues?
- Check you open node ports https://pi-mods.de/nodeports/
- PureVPN with my referral code for a free 15 days trial.
If you are new to mining pi, be sure to read my other starter guides. Join my mining circle with the @codergrr referral code for inside tips and guides.
